Type
Duration
Team
MY ROLE
Tools
The Challenge: Why Do Kids Struggle with Language Apps?
Existing digital secondary language learning tools are not optimally designed for children of the age group of 5-11 years old .
Imagine being a child, trying to learn a new language through a screen—endless words flashing, audio cues playing, but nothing tangible to touch, feel, or move. Research shows that young children (ages 5-9) learn best when they can physically engage with concepts, yet most popular language-learning apps, like Duolingo, focus solely on screen-based interaction.
The problem? Children lose interest, struggle to retain vocabulary, and miss out on the cognitive benefits of hands-on learning.
How might we bring tactility into language learning, making it more engaging, effective, and interactive for young learners?
Our Solution: A Hands-On Experience
A simple tactile language learning game that uses RFID tagging and scanning that works in tandem with a language learning app.
We designed a tactile-first, multimodal learning experience that merges physical gameplay with digital feedback. Instead of relying on screens alone, children interact with RFID-powered word blocks to build words and sentences while receiving real-time validation through an interactive app.
This means, instead of typing words, children physically arrange them and instead of passive learning, they actively play, experiment, and correct themselves.
The Prototype: Introducing 'LingoBlocks'
As the level begins, a sentence or question appears on the screen, prompting the child to interact with the physical blocks. They slide in letter blocks for fill-in-the-blank questions or word blocks for jumbled sentence challenges, with each word block color-coded to represent different grammar elements like nouns, verbs, and articles.
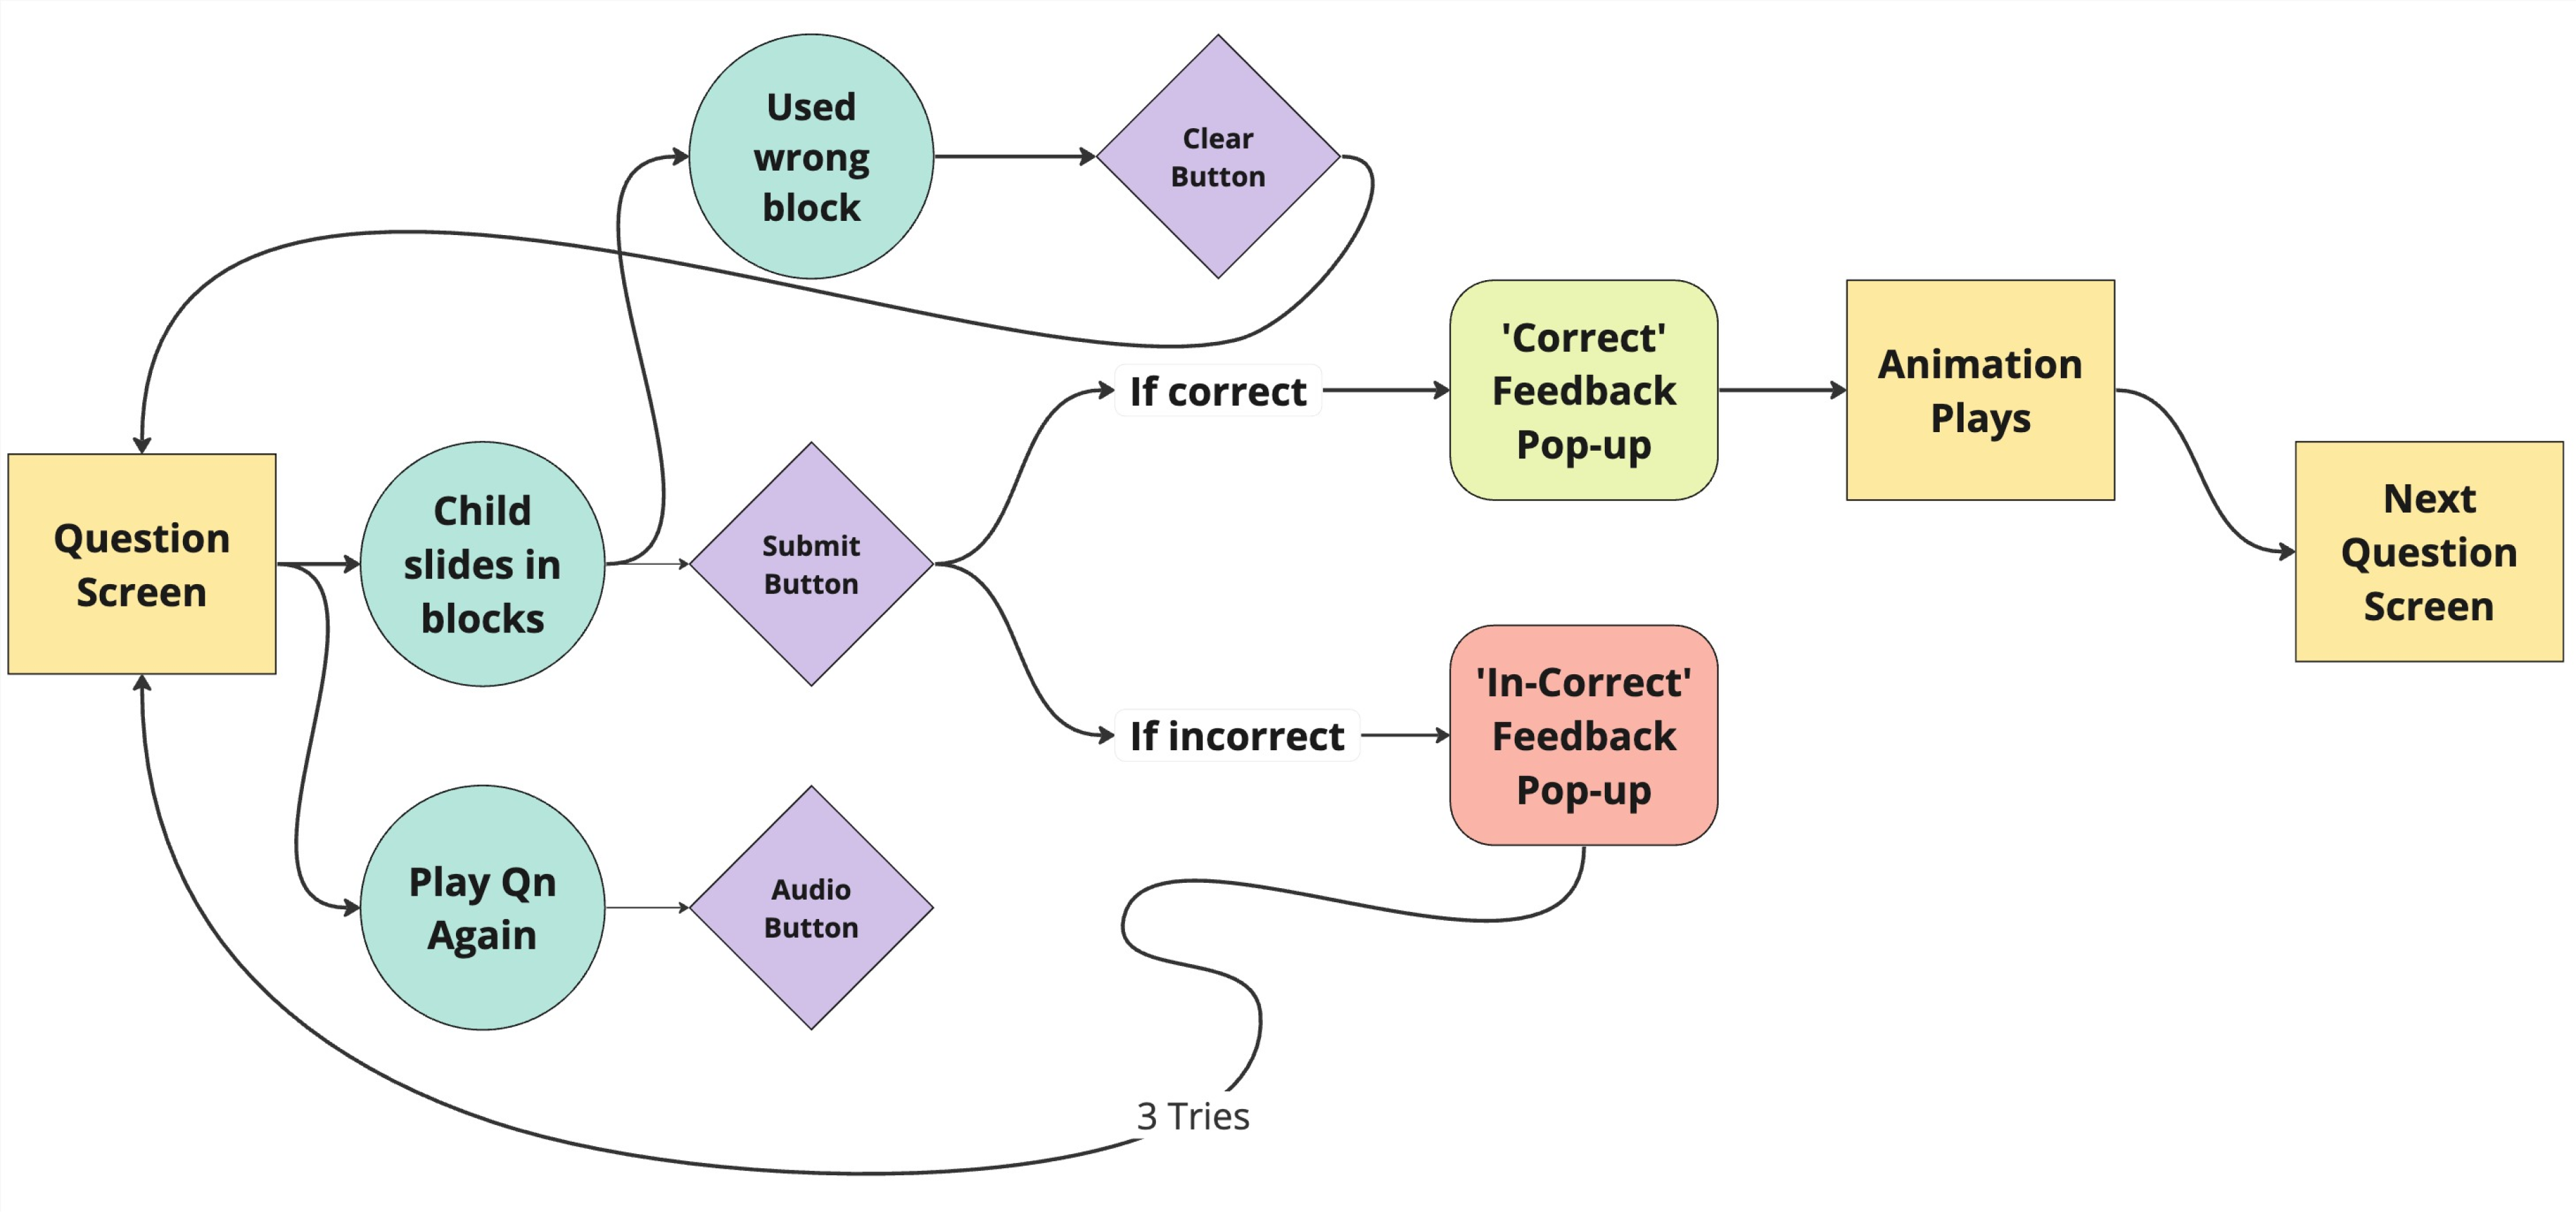
Once the blocks are placed, pressing the Submit button checks the answer. Correct answers trigger animations as a reward, reinforcing learning in an engaging way. If the answer is incorrect, the child has three attempts to try again. The Clear button allows them to remove mistakes before submitting, while the Play button replays the audio of the sentence. To minimize screen interaction, all buttons are part of the physical setup rather than on-screen.
The story progresses only when answers are correct, ensuring a hands-on, immersive learning experience with intrinsic motivation that keeps children engaged.
Understanding Our Users: Who Are We Designing For?
When designing a language-learning tool for children, it’s crucial to recognize that one size does not fit all. Most existing language-learning apps are designed for older learners (typically ages 11 and up) who can engage with screens for longer periods and learn effectively through reading and writing-based methods. However, research shows that children aged 5-9 learn differently—and that’s exactly who we designed for.
The Attention Span Challenge
Children in this age group struggle to stay engaged with screen-based learning for extended periods. According to the American Academy of Pediatrics, a child’s attention span is typically 3 to 5 minutes per year of age. This means that:
- A 6-year-old can focus for 12-18 minutes—but only if the task is engaging and rewarding.
- Long, screen-based lessons are often ineffective for this age group, leading to frustration and disengagement.
How Do Young Children Learn Best?
The VARK Learning Model identifies four learning types: visual, auditory, reading/writing, and kinesthetic. For young children who haven’t fully developed reading and writing skills, kinesthetic and sensory learning styles take precedence. This means they absorb information better through touch, movement, and play rather than passive screen-based interactions.
The Power of Hands-On Learning
Studies show that tactile learning is essential for cognitive development and information retention as it engages multiple senses (sight, touch, movement) stimulating different parts of the brain. Hands-on experiences also helps children develop a sense of ownership over their learning process.
Learning through Safe Mistakes
Another key finding was that error tolerance is essential. Kids need a way to make mistakes and correct them in a safe, engaging environment.
Young children have short attention spans and struggle with passive, screen-based learning, making engagement crucial. Research shows that kinesthetic learning—using touch, movement, and play—helps children absorb and retain information more effectively. Providing a safe space for mistakes fosters confidence, problem-solving, and deeper learning without frustration.
Designing the Gameplay: Learning Through Play
We followed a three-step approach to create an engaging and effective learning experience:
- Selecting the right technology
- Designing an intuitive experience of a level for proof of concept
- Crafting visually appealing elements tailored for children.
Choosing the Right Technology: Blending Physical & Digital Interaction
Our first step was finding the right technology to integrate hands-on learning with digital feedback. After evaluating various tools, we settled on the following.
- RFID & NFC Technology – Allows children to scan physical word/letter blocks into the game.
- Arduino & p5.js – Bridges the gap between physical interactions and digital feedback.
- Push Buttons & Sensors – Ensures the child doesn’t have to interact with a screen to progress.
- Audio Integration – Helps reinforce pronunciation and comprehension.

c. Arduino UNO with Breadboard (Elegoo UNO R3 Super Starter Kit)

Crafting an Intuitive & Engaging Gameplay Experience
Once we finalized our technology, we turned our attention to designing the content for our proof of concept. For the purposes of our prototype, we chose Spanish as it is the third most learned language in the world and is the official language of more than 20 countries. The levels progress similar to other langugage learning apps such as Duolingo.
- Level 1: Learning Basic Vocabulary of different categories.
- Level 2: Sentence Formation
- Level 3: Storytelling & Comprehension
For our prototype, we focused on Level 3 where children engage in narrative-based challenges using words and sentences to complete a story. We chose the classic tale of The Tortoise and the Hare (La Tortuga y La Liebre).

To reinforce sentence structure and grammar, we color-coded the blocks based on their grammatical role, such as subject, verb, noun, and article. Since the words in each block could vary depending on the story, the words on the screen were also color-coded to match, guiding the child in placing the correct blocks. This system would help children understand the order of words in a sentence but also provided a visual association for different grammar components, making learning more intuitive and structured.
User Flow: How Kids Experience the Game
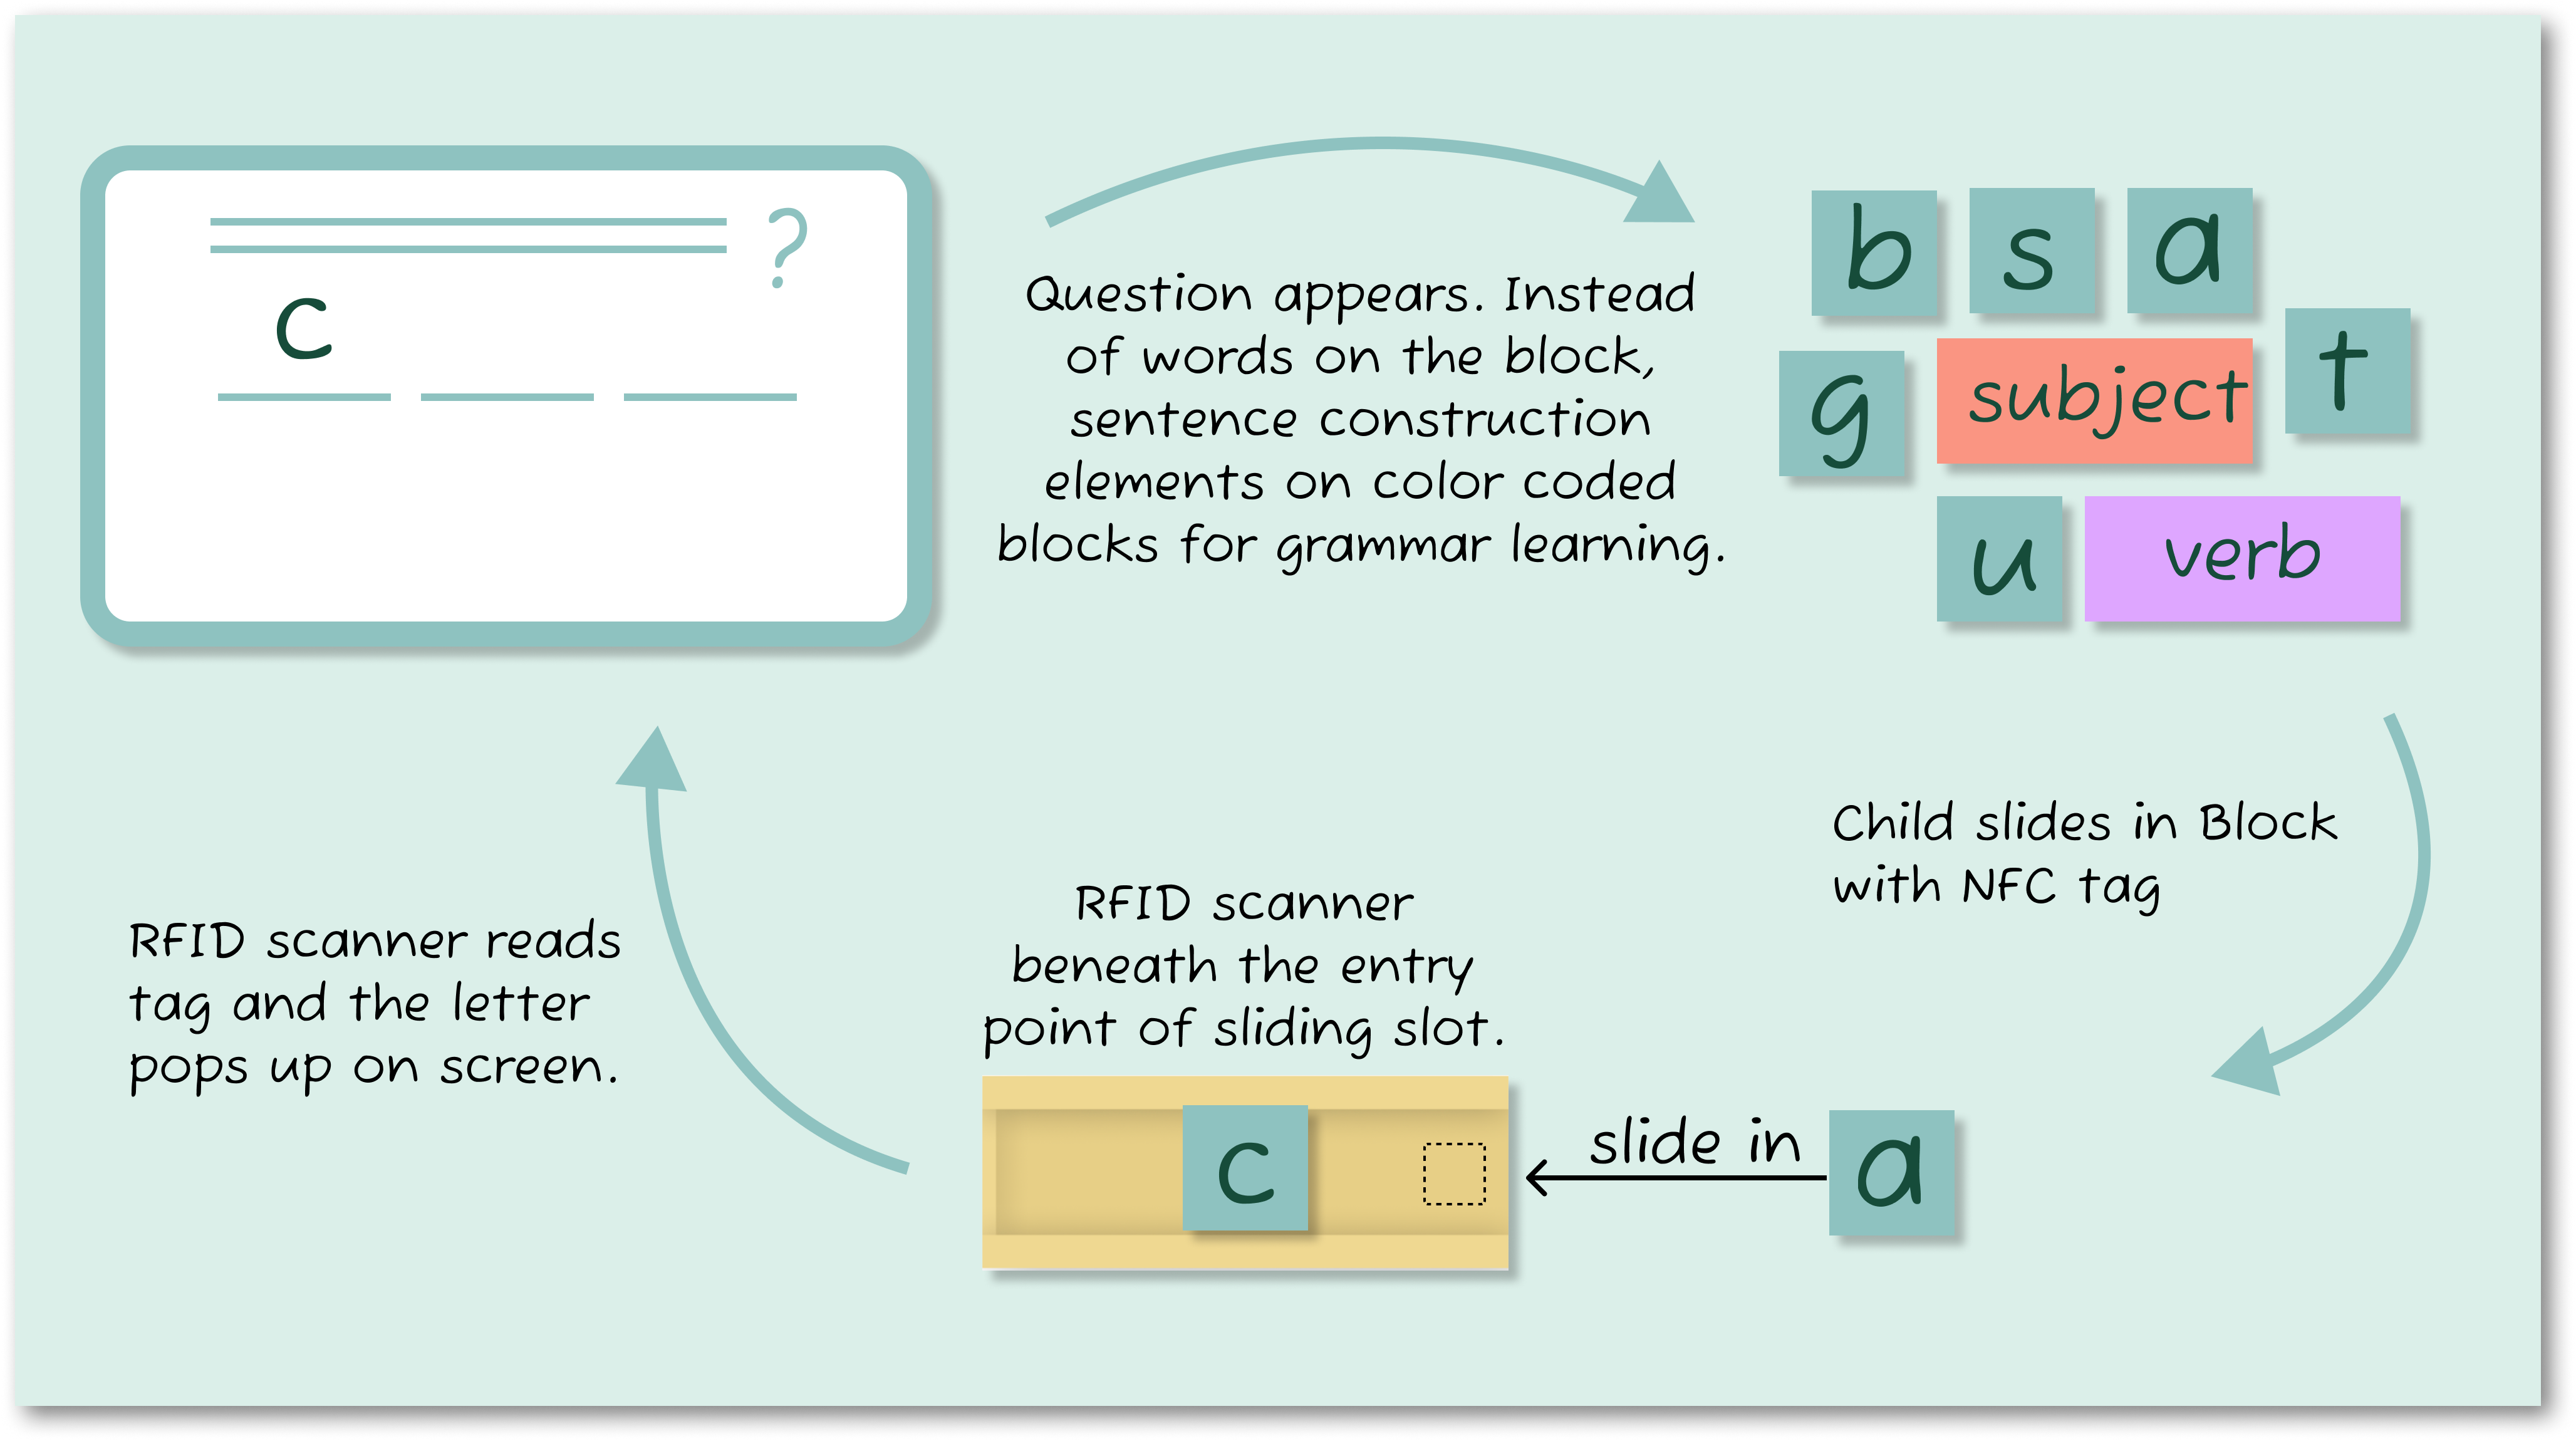
To make the game feel fluid and intuitive, we carefully designed the interaction flow:
- A sentence appears on the screen.
- The child physically slides letter or word blocks into the designated slot.
- Real-time validation occur
- Correct Answer: A celebratory animation plays, reinforcing learning.
- Incorrect Answer: A gentle nudge prompts the child to try again (with up to three attempts).
- If a mistake is made, the child can press the ‘Clear’ button to reset the blocks.
- If needed, they can tap the ‘Play’ button to hear the sentence repeated.
Designing the Visuals for Young Learners
With the game structure in place, we shifted our focus to visual design—ensuring the game was not only engaging but also accessible and delightful. We followed key UX principles for designing for young children:

- Bright & Playful Color Palette
- Studies show that vibrant colors evoke joy and excitement in young learners.
- We referenced Duolingo’s design system and PBS Kids branding to ensure our palette was visually stimulating without being overwhelming.
- Child-Friendly Typography
- We chose Paytone One, a sans-serif font that is highly readable and friendly for young readers.
- Rounded, soft letterforms provide accessibility for early learners.
- Expressive, Anthropomorphic Characters
- Characters with big eyes & round features help children form an emotional connection with the game.
- The illustrative style was kept painterly and whimsical.
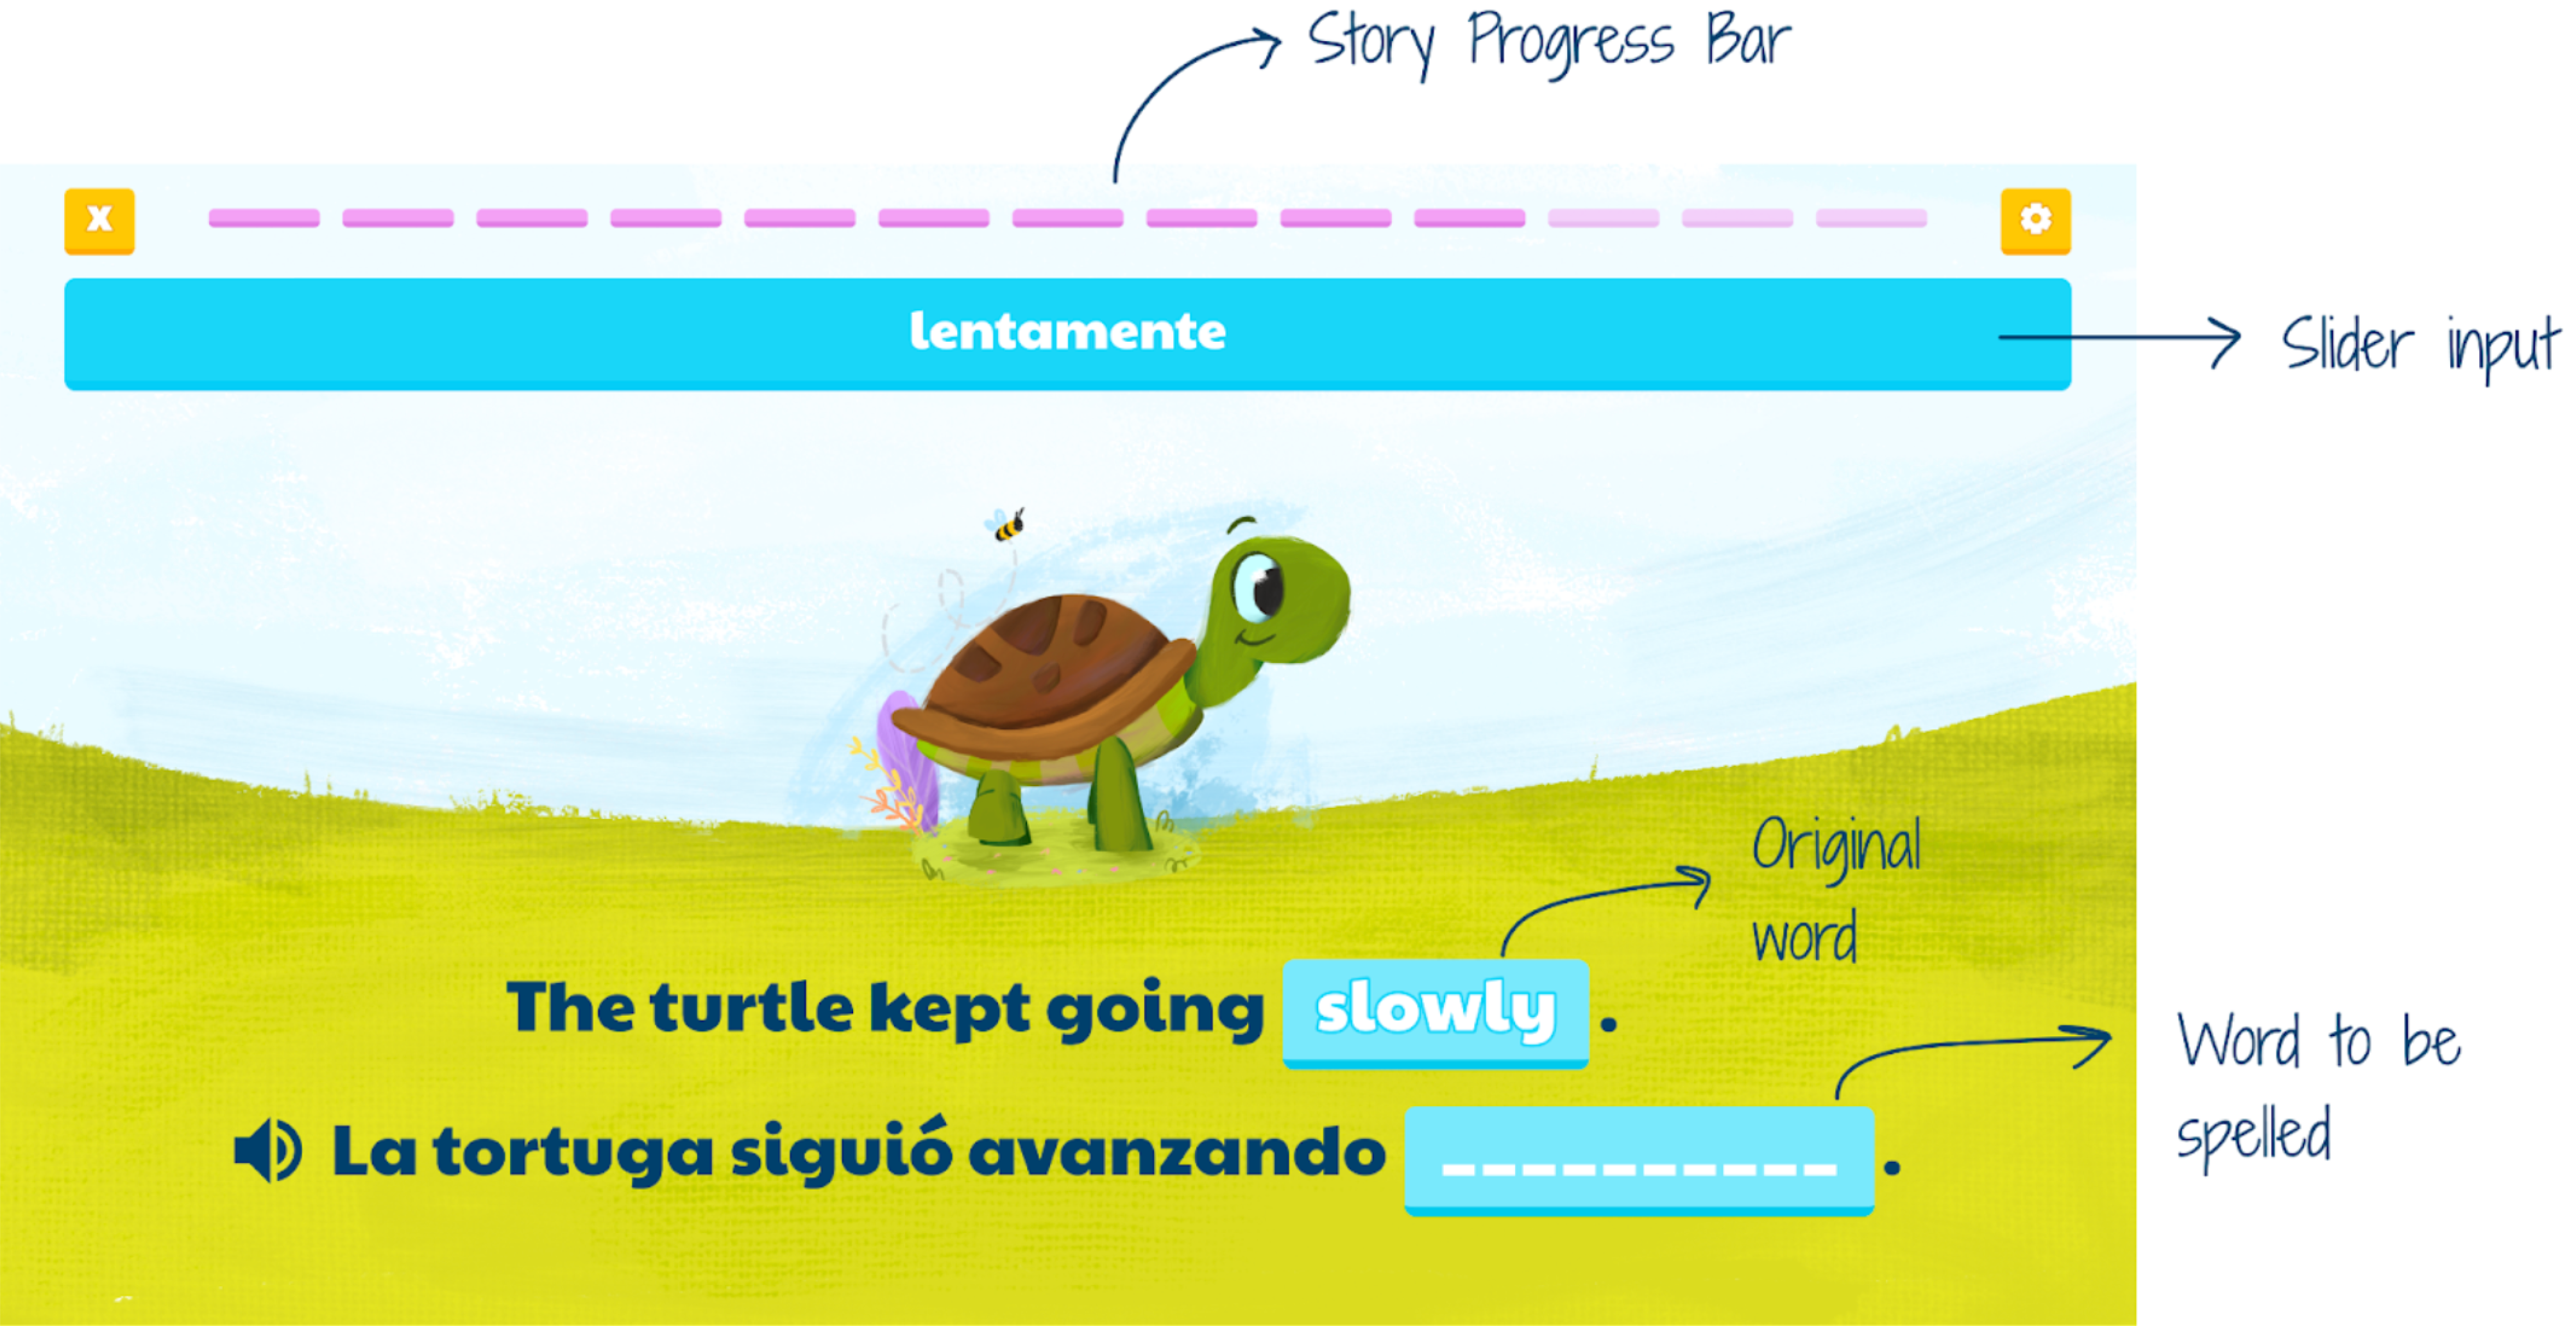
- Skeuomorphic UI Elements for Intuitive Interaction
- Buttons and UI elements were designed to be large, bold, and visually distinct to prevent confusion.
- We avoided a flat UI approach, opting for a mid-skeuomorphic design where buttons "pop" off the screen, making them feel interactive.

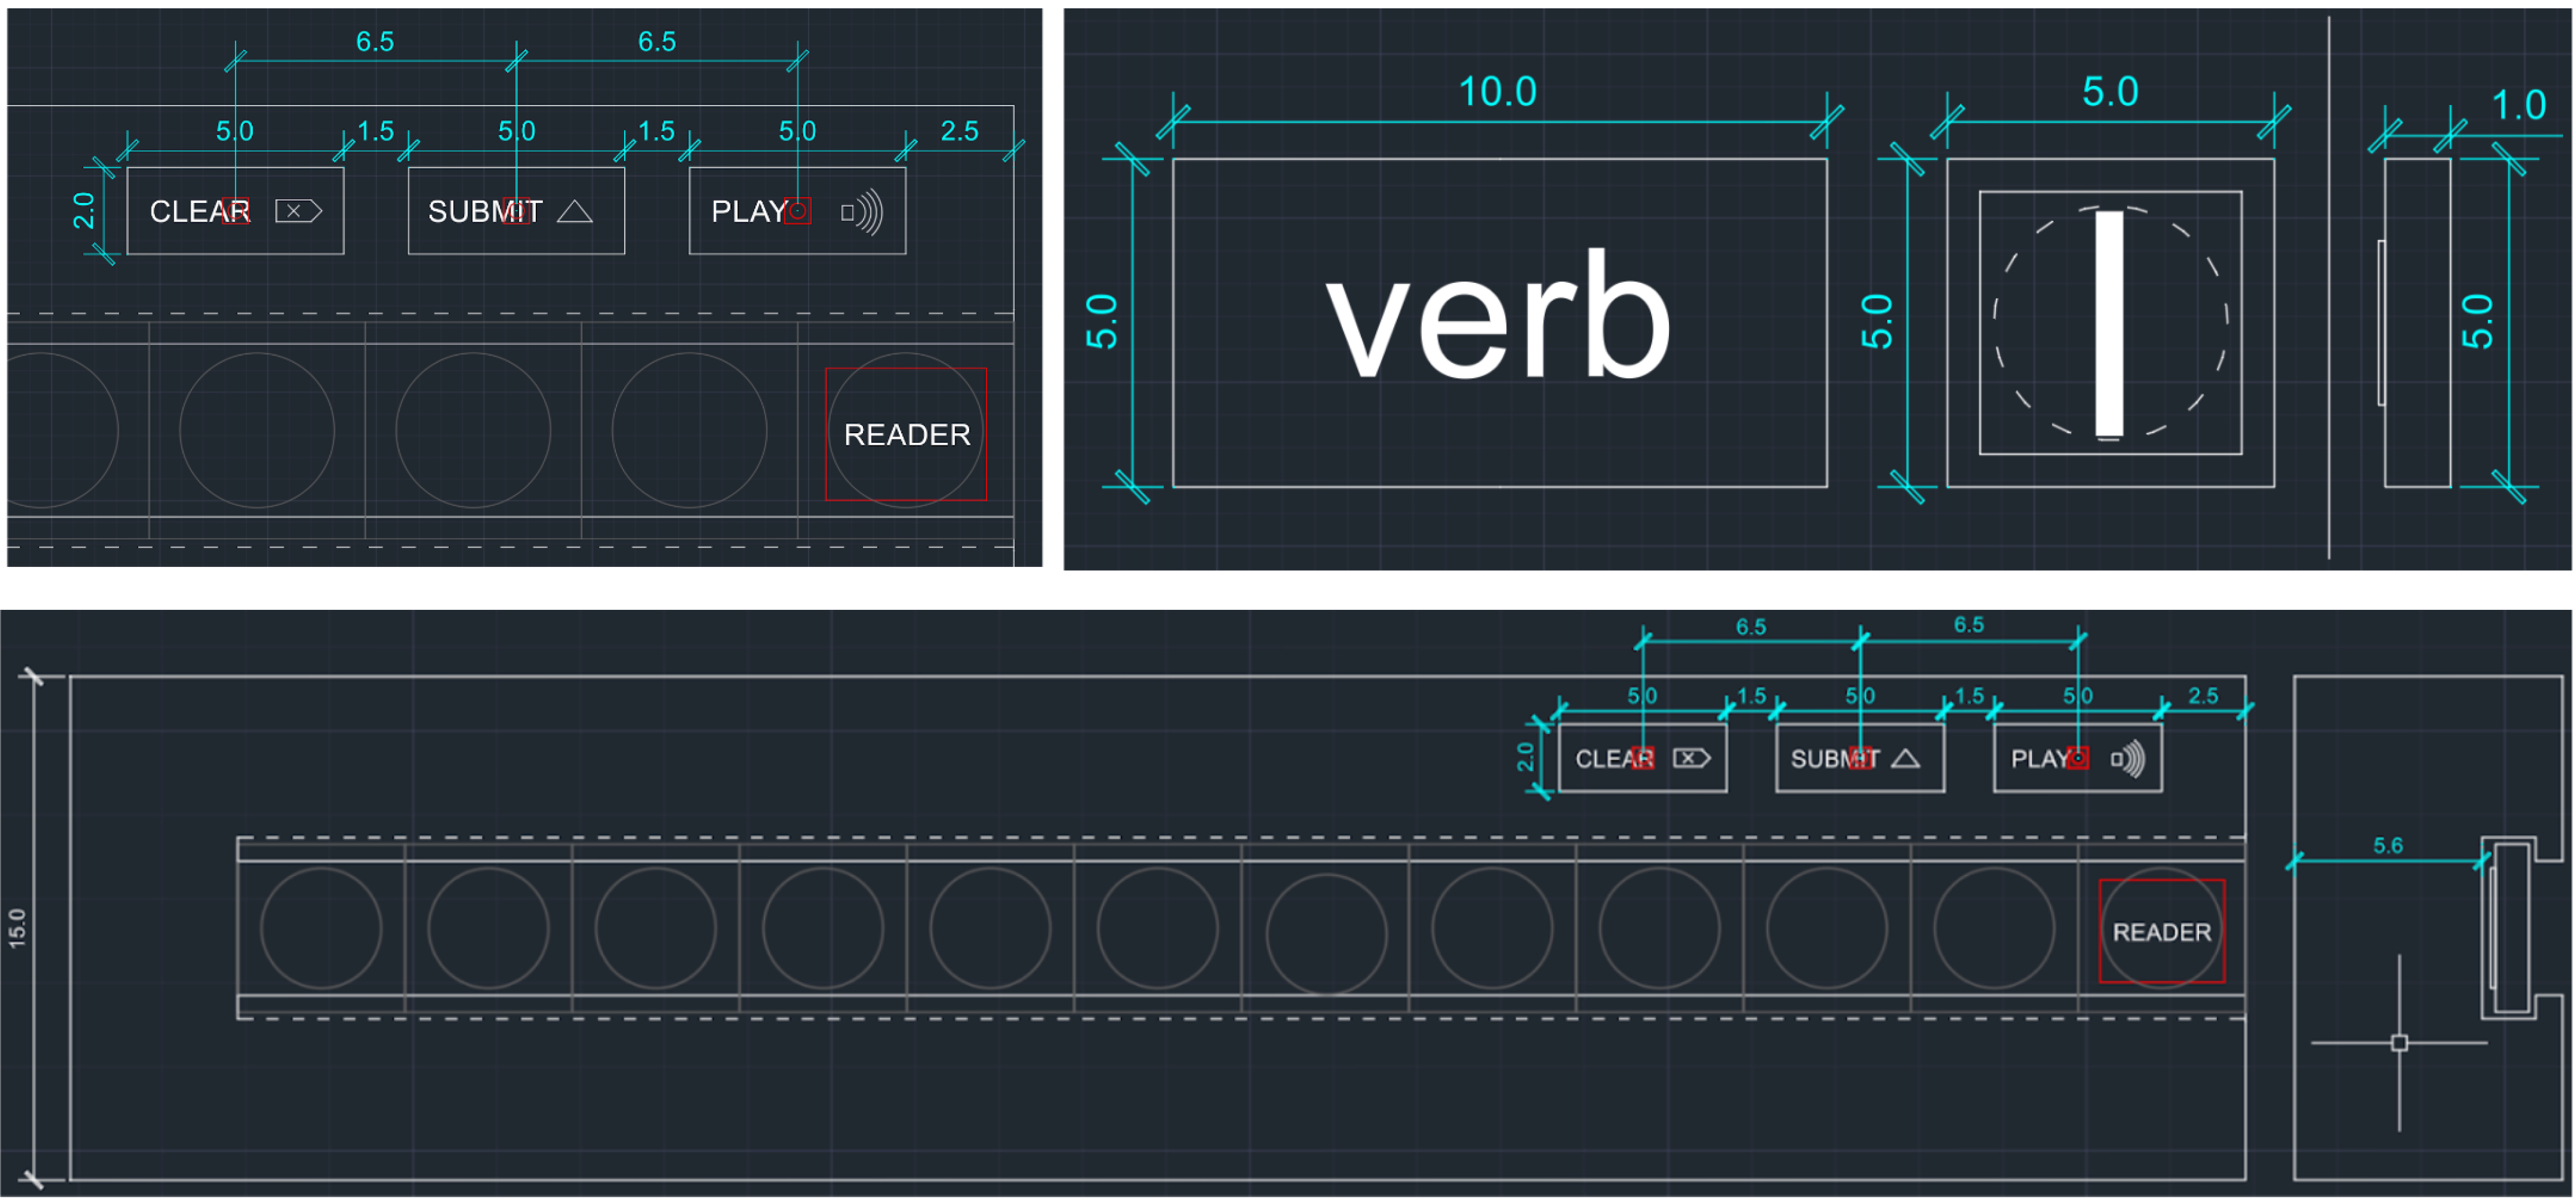
The same visual language was applied to the physical set-up. The word blocks are intentionally kept to be twice the size of the letter blocks so that the child is easily able to distinguish the two and is able to visually associate them with letters and groups of letters, i.e. words, by size.
Building the Prototype
Merging the RFID, Arduino and P5.js
To bring our interactive learning experience to life, we began by encoding NFC tags using the NFC Tools application, storing words and characters onto each tag before attaching them to the word and character blocks. The Arduino Uno processed data from the RFID reader and push buttons, ensuring seamless interaction between the physical blocks and the digital interface. The p5.js setup was then integrated to handle real-time validation and error tolerance, displaying the game screens and providing instant feedback on correct and incorrect answers.

The Physical Housing
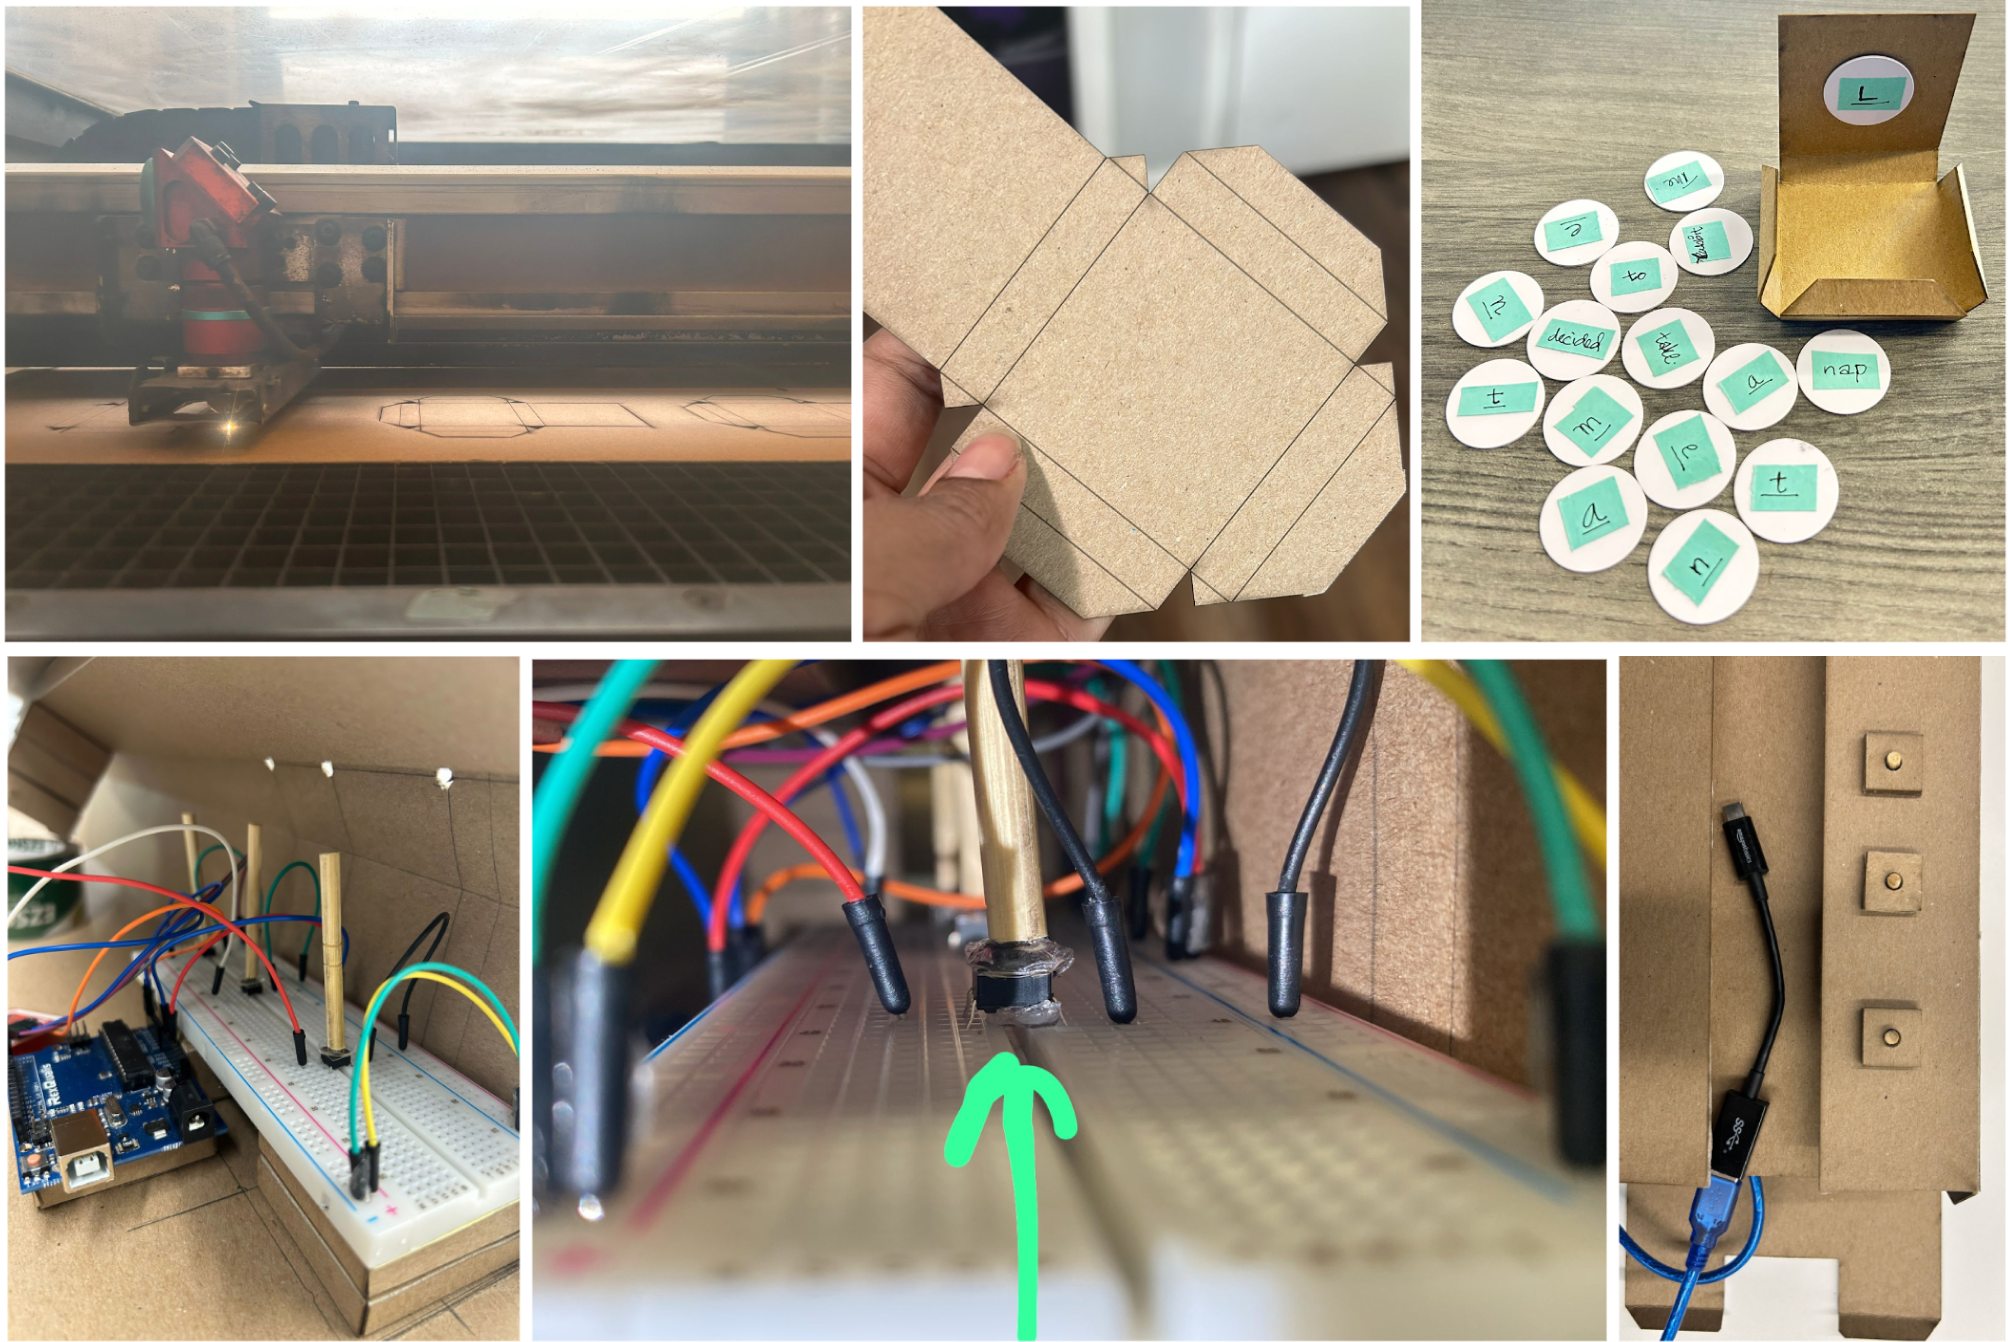
For the physical design, we focused on tactility and clarity. We established the letter blocks at 5x5x1 cm for easy handling, while word blocks were made twice as large (10x5x1 cm) to ensure clear distinction between letters and full words. The main box was designed to house the Arduino setup, with a slider slot and visible buttons to create an intuitive user experience. Using AutoCAD, we carefully mapped out surface developments for each component, preparing precise files for laser cutting.
Bringing it All Together
Once the components were ready, we assembled the letter and word blocks, labeling the NFC tags and applying stickers for identification. The Arduino and breadboard were fixed onto the base sheet, while the button positions were projected onto the top sheet and cut out for accuracy. Finally, we positioned the RFID scanner at the entrance of the slider slot, ensuring that each block was scanned automatically as it was slid in—seamlessly merging the physical and digital learning experience.
Here's Us at the Exhibition
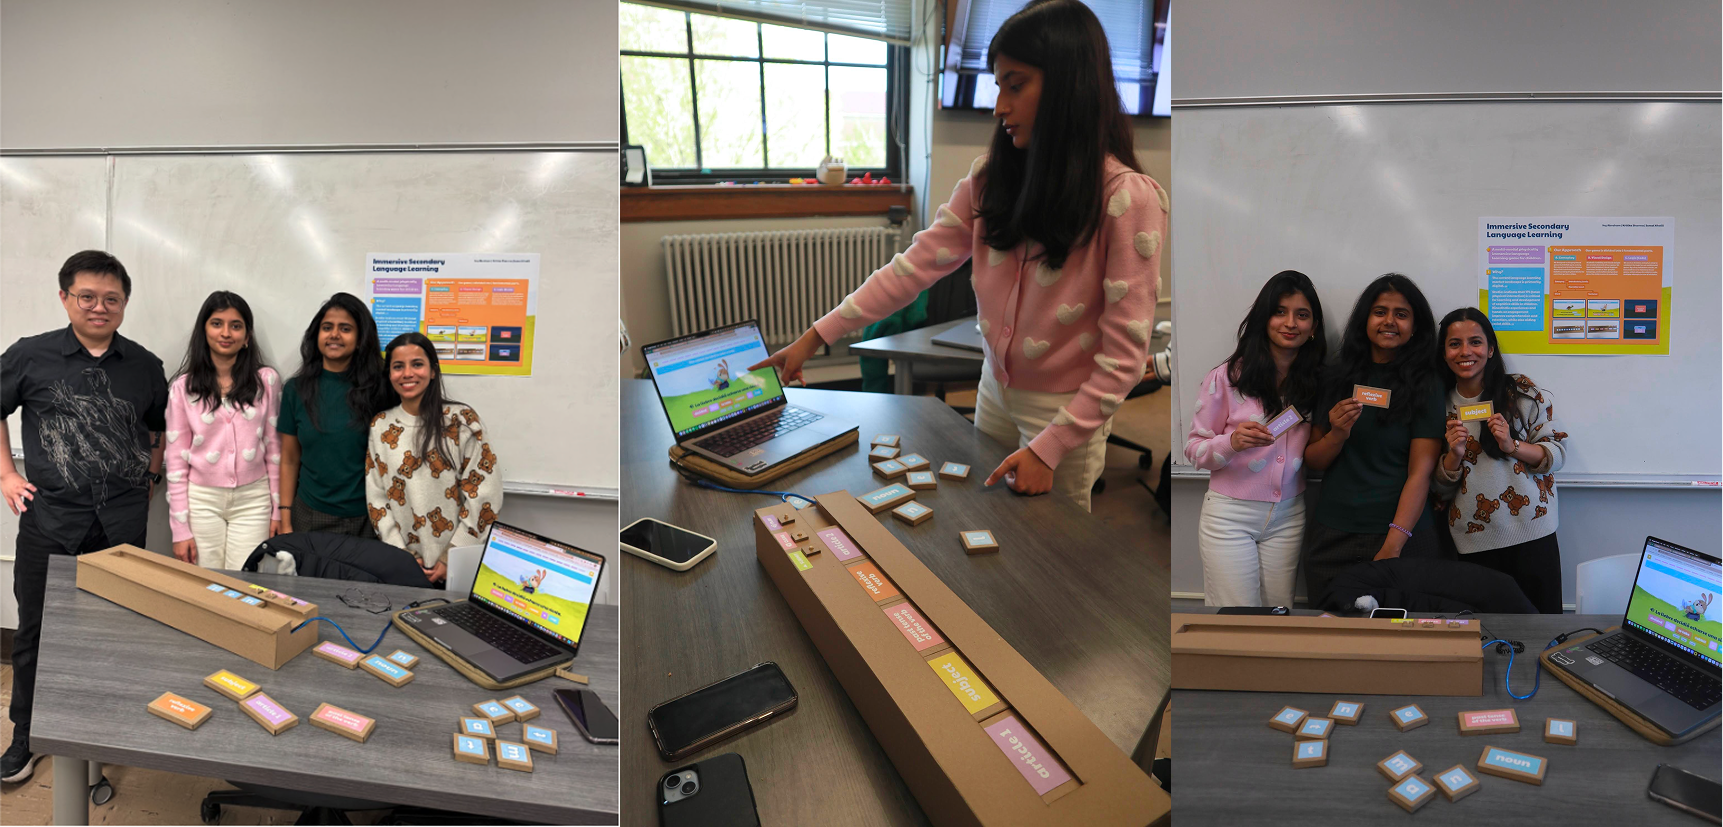
An exciting exhibit was set-up by our professor Dr. Liang He where people from across multiple departments of Purdue and guests from other universities got an opportunity to experience the amazing projects worked on by the talented 2023 Graduate Cohort. The feedback received was overwhelmingly positive and future interest was expressed.
Evaluating our Solution: Usability Testing
We tested our solution for usability with 7 participants in total. 5 of these tests were carried out with adults before the final exhibit. 2 tests were carried out with children of ages 8, and 9 post-exhibit. None of the participants were familiar with Spanish. The tests were carried out in person. Users were given a brief introduction to the game. The digital components were introduced and a verbal explanation of the sliding mechanism will be provided.

Findings and Suggestions
- Users found the delay in scanning of blocks frustrating. Some users slid the block in, but the tag did not get scanned. This was particularly true for word blocks as the NFC tags were in a specific position which was not visible.
- This is due to the misaligned longitudinal placement of the RFID scanner. It may be better to put it in the longitudinal center in a future prototype.
- Tests revealed that the blocks were scanned when sliding them out. This was frustrating for users as they had to clear the field repeatedly.
- It was suggested that the slider be open from both sides. We would consider this as a next step.
- As assumed, buttons were described as frustrating due to the inherent mechanical delay. The wooden dowels used to put the button became dislodged due to repeated use.
- To improve stability, enclosing the rods in a casing that secures the buttons onto the breadboard and guides the motion of the rods directly onto the button may help.
- Users wished there was a ‘flap’ to open up the slider and remove a specific block from any position.
- This is not possible as the RFID scanner will not detect that the block has been removed.
- The clear button clears the entire input field instead of clearing off words one by one. Users found this frustrating.
- In a future iteration, we will code the Clear button to only remove the most recent input.
- If a tag was scanned too slow, it would show up twice on the screen.
- A time delay can be coded in to ignore the same characters being scanned multiple times in a short period of time.
- On Screen 2 (sentence building), the last block rested directly over the RFID scanner and kept getting scanned in a loop due to the draw function in p5.js being a lo
- In a future iteration, we will code the RFID to stop pause scanning when the last block is scanned.


